

Minor scratches on surfaces can be an eyesore, detracting from the overall appearance of your belongings. Whether it’s a small scratch on a car, an appliance, or furniture, addressing these imperfections promptly is essential. Fortunately, you don’t always need to repaint to achieve a desirable result. There are effective methods to repair these minor blemishes and make your surface look like new again.
One of the most common approaches is the touch-up technique, which involves using specialized products designed to fill in and conceal scratches. These products often come in various colors to match your surface, ensuring a seamless repair. By selecting the right touch-up solution, you can save both time and money while maintaining the aesthetic integrity of your items.
In this article, we will explore practical strategies and tips to help you repair minor scratches without the need for full repainting. Whether you’re addressing a mark on your car’s paint or a scratch on wood furniture, these steps will equip you with the knowledge to restore your surfaces effectively.
Identifying the Type of Scratch on Your Surface
Before you can effectively repair a scratch, it’s essential to identify its type. Scratches can generally be categorized into three main types: surface scratches, deep scratches, and gouges.
Surface scratches are the most common type, affecting only the clear coat or paint layer. These imperfections are usually light and can often be rectified using polishing compounds or scratch-removal products. If the scratch feels smooth to the touch and doesn’t penetrate through the paint layer, it’s likely a surface scratch.
Deep scratches extend beyond the clear coat, reaching the base paint layer. These may require more intensive repair methods, as they are more visible and can lead to further damage if not addressed. If the scratch appears darker or demonstrates a change in texture, it’s indicative of a deep scratch.
Gouges represent the most severe form of scratches, where material is removed from the surface, resulting in a noticeable indentation. Repairing gouges often requires fillers or touch-up paint, as they compromise the structural integrity of the surface. Identifying this type of scratch involves checking for depth and areas missing material.
By determining the type of scratch present, you can choose the appropriate repair method, ensuring that your surface is restored effectively without the need for repainting.
Tools and Products Needed for Scratch Repair
To effectively address minor scratches without the need for repainting, it is essential to have the right tools and products at your disposal. Here is a list of key items you will need for successful touch-up repair.
1. Scratch Repair Kit: A comprehensive scratch repair kit typically includes a variety of compounds and applicators specifically designed to fill and conceal scratches. Look for kits that offer color-matched touch-up solutions to achieve seamless results.
2. Microfiber Cloth: A soft microfiber cloth is vital for cleaning the scratched area before applying any products. This ensures that dirt and debris do not interfere with the repair process and helps create a smooth surface for touch-up application.
3. Rubbing Compound: A fine rubbing compound is useful for polishing the surface surrounding the scratch. It aids in blending the touch-up paint with the original surface finish, making the repair less noticeable.
4. Touch-Up Paint: Color-matched touch-up paint is crucial for filling in scratches. It is available in small bottles or pens and should closely match your surface color for effective coverage.
5. Applicators: Depending on the extent of the scratch, you may need different applicators such as brushes, pens, or sponges. These tools help you precisely apply touch-up paint to the scratch without affecting the surrounding area.
6. Clear Coat: After applying touch-up paint, a clear coat helps seal in the repair and adds a protective layer, enhancing the shine and durability of the fixed area.
Having these tools and products ready will streamline the scratch repair process, allowing you to restore your surface efficiently and effectively.
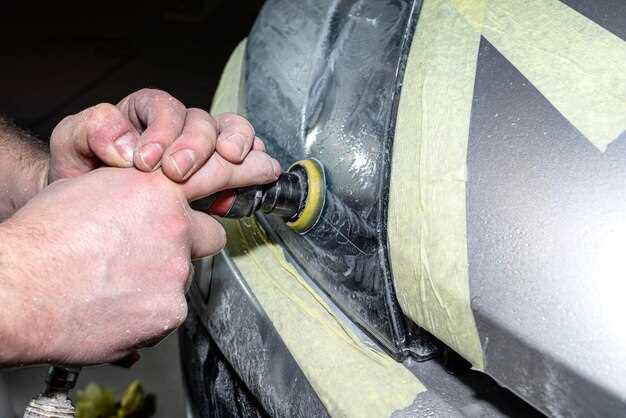
Step-by-Step Guide to Buffing Out Minor Scratches
Buffing out minor scratches can restore the appearance of your surface without the need for a full repaint. Follow these steps to effectively remove scratches using a touch-up method.
Step 1: Gather Your Materials
You’ll need a soft microfiber cloth, a mild abrasive polish, a scratch remover or touch-up paint, and a fine-grit sandpaper (if necessary). Ensure you have a clean workspace to avoid introducing new scratches.
Step 2: Clean the Area
Begin by thoroughly cleaning the scratched area with soapy water or an appropriate cleaner. Remove any dirt or debris to prevent further scratching during the buffing process. Dry the surface completely with a microfiber cloth.
Step 3: Apply the Polish
Using your cloth, apply a small amount of the mild abrasive polish to the scratched area. Make sure not to over-apply; a little goes a long way. The polish will help to fill and minimize the appearance of the scratch.
Step 4: Buff Out the Scratch
Gently buff the area in a circular motion using the microfiber cloth. Apply light pressure, allowing the polish to work its way into the scratch. Buff for about 30 seconds, and keep checking your progress to avoid excessive abrasion.
Step 5: Inspect the Results
After buffing, wipe off any excess polish and inspect the scratch. If it’s still visible, you may need to repeat the buffing process or consider applying a touch-up paint if the scratch is deep.
Step 6: Final Touches
If you applied touch-up paint, allow it to dry completely according to the manufacturer’s instructions. Once dry, buff the area lightly once more to blend the texture with the surrounding surface.
By following these steps, you can effectively buff out minor scratches, improving the overall appearance of your surface without needing to repaint.
Using Touch-Up Paint for Color Matching and Application
Touch-up paint is an effective solution for addressing minor scratches on a surface without the need for extensive repainting. Selecting the right color to match the existing finish is crucial for achieving a seamless repair. Start by locating the paint code, which is typically found on a sticker in the engine compartment, door jamb, or manufacturer’s manual. This code will guide you to the correct hue, ensuring an exact match.
Before applying touch-up paint, it is essential to prepare the scratched area properly. Clean the surface with soap and water to remove any debris, then gently sand the scratch with fine-grit sandpaper. This step opens the surface and allows the touch-up paint to adhere better.
When ready to apply, use the touch-up paint sparingly. A small brush or applicator is ideal for targeting the scratched area without overlapping onto unaffected regions. Apply the paint in thin layers, allowing each layer to dry completely before adding more, as this will prevent clumping and unevenness.
After the final application, it is advisable to let the area cure for at least 24 hours. Once cured, you may choose to polish the repair gently to achieve a smooth finish that blends with the surrounding surface. This method not only conceals the scratch effectively but also prolongs the life of your finish.
Understanding the Limitations of Scratch Repair Techniques
When it comes to repairing minor scratches, it’s essential to recognize the limitations of various techniques available. While touch-up methods can effectively conceal minor imperfections, they are not a substitute for professional repair in certain cases.
Here are some key limitations of scratch repair techniques:
- Depth of Scratches: Shallow scratches may respond well to touch-up products, but deeper scratches may still be visible after repair. If a scratch penetrates the clear coat and affects the paint layer, a simple touch-up may not suffice.
- Color Matching: Achieving a perfect color match is challenging. Most touch-up paints are designed to approximate the original color, but variations can occur due to fading, environmental factors, or manufacturer differences.
- Surface Texture: Scratch repair techniques generally focus on color correction and may not restore the original texture of the surface. This can result in a noticeable difference between the repaired area and the surrounding surface.
- Durability: Touch-up repairs may not offer the same durability as factory finishes. Over time, touch-up paint can wear off or become discolored, especially if exposed to harsh weather conditions.
- Skill Level Required: Some repair techniques require a certain level of skill and experience. Improper application can lead to an unsatisfactory finish or even further damage to the surface.
In conclusion, while minor scratch repair techniques, including touch-up, can be effective for superficial damage, it is crucial to understand their limitations. Significant scratches or areas with extensive damage may still necessitate professional intervention for a thorough and lasting repair.
Preventive Measures to Avoid Future Scratches
To maintain the appearance of your surfaces and reduce the need for touch-up or repair work, consider implementing several preventive measures. First, regularly apply protective coatings or sealants to surfaces such as furniture, countertops, and vehicles. These products create a barrier that can absorb impacts and resist scratches.
Additionally, be mindful of the objects you use on these surfaces. Avoid dragging items such as tools or heavy equipment, and invest in felt pads or coasters that can prevent scratches from occurring when moving objects. When it comes to cleaning, opt for soft cloths or microfiber materials that won’t abrade the surface.
Another effective strategy is to organize your space, keeping frequently used items in designated areas where they won’t come into contact with delicate surfaces. Implementing a routine maintenance check can also help spot early signs of wear, allowing you to perform minor touch-ups and repairs before they escalate into larger issues.
Lastly, educate family members or coworkers about the importance of treating surfaces with care to foster a culture of respect for shared spaces. By taking these preventive steps, you can significantly extend the lifespan of your surfaces while minimizing the need for future touch-ups and repairs.