

As temperatures rise, ensuring your air conditioning (AC) system is operating efficiently is crucial for maintaining a comfortable indoor environment. One of the key aspects of AC maintenance is understanding when and how to recharge your system. Recharging your AC involves adding refrigerant to the system, which is essential for its optimal performance. However, it’s important to follow specific guidelines and best practices to avoid potential issues.
Recharging your AC system isn’t just about adding refrigerant; it’s also about recognizing the signs that your system may need a recharge. Common indicators include insufficient cooling, strange noises, or the presence of ice on the coils. Addressing these symptoms promptly can prevent further complications and ensure your system runs smoothly. Before proceeding with a recharge, it is advisable to perform a thorough inspection of the entire system to identify any underlying problems.
In this article, we will explore essential tips and best practices for recharging your air conditioning system. From understanding the right type of refrigerant to using the appropriate tools safely, we aim to equip you with the knowledge needed to effectively recharge your AC. By following these guidelines, you can extend the lifespan of your AC system and maintain a comfortable climate in your home throughout the hotter months.
Identifying Signs of Low Refrigerant Levels

Low refrigerant levels in your air conditioning (AC) system can lead to inefficient cooling and potential damage to the unit. Recognizing the signs early can help you avoid costly repairs and ensure your AC runs smoothly. Here are some common indicators of low refrigerant levels:
- Warm Air Output: The most obvious sign of low freon is when the AC blows warm air instead of cool. If your system is unable to maintain the desired temperature, it could be due to insufficient refrigerant.
- Inefficient Cooling: Even if the air is somewhat cool, if it takes longer than usual to cool down a room, it may indicate low refrigerant levels.
- Increased Energy Bills: If your AC unit is running continuously without effectively cooling your space, this can lead to higher energy consumption and increased utility bills.
- Frost on Evaporator Coils: When freon levels are low, the evaporator coils can become too cold, causing frost buildup. If you notice frost or ice forming on the coils, it’s time to check your refrigerant level.
- Hissing or Bubbling Noises: Low refrigerant can lead to leaks in the AC system, which may create hissing or bubbling sounds. These noises indicate that refrigerant is escaping and should be addressed.
- Frequent Cycling: An AC system that frequently turns on and off may struggle to reach set temperatures due to insufficient freon levels.
Monitoring these signs can help maintain your air conditioning system’s health. If you suspect low refrigerant levels, consult a professional technician for diagnosis and recharge.
Steps to Safely Check Your AC Refrigerant
Ensuring that your air conditioning system has the correct level of refrigerant is essential for optimal performance. Before you start the recharge process, it is crucial to check the current refrigerant level in a safe manner. Follow these steps to safely check your AC refrigerant:
1. Gather Necessary Tools
To check your AC refrigerant, you will need the following tools:
| Tool | Purpose |
|---|---|
| Refrigerant gauge set | To measure system pressure |
| Thermometer | To measure air temperature |
| Safety gloves | To protect your hands |
| Safety goggles | To protect your eyes |
2. Prepare the AC Unit
Before checking the refrigerant levels, ensure your AC unit is turned off. This prevents injury and safeguards the system. Allow the system to sit for a few minutes to stabilize the pressure.
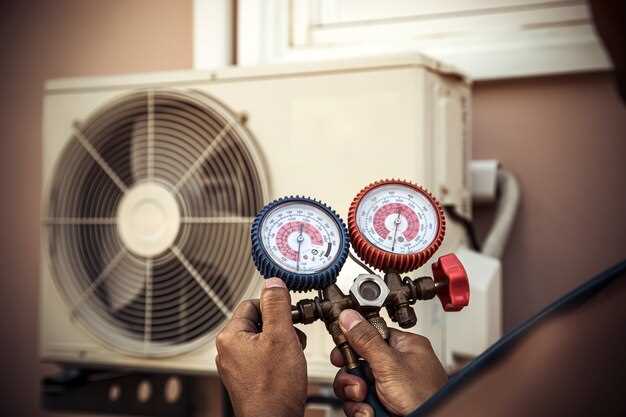
3. Connect the Refrigerant Gauges
Locate the service ports on your AC unit. Attach the low-pressure gauge (usually colored blue) to the low-pressure service port and the high-pressure gauge (colored red) to the high-pressure service port. Ensure that the connections are secure to avoid leaks.
4. Read the Pressure Levels
Turn the AC unit back on and observe the pressure readings on the gauges. Consult the manufacturer’s specifications for the ideal pressure readings for your system. If the readings are lower than recommended, it may indicate a refrigerant leak or that the system needs a recharge.
5. Check the Temperature Differential
To further assess the refrigerant level’s adequacy, measure the temperature of the air coming from the supply vents using a thermometer. Compare this reading to the outdoor temperature. A significant difference (typically around 15-20°F) indicates that the system is functioning correctly. A lower differential may suggest insufficient refrigerant levels.
6. Inspect for Leaks
If low refrigerant levels are indicated, inspect the AC system for any leaks. Look for oily spots around the connections, coils, or hoses, as this may signify a refrigerant leak. If you find any, it is best to consult a professional technician for repairs.
7. Recharge if Necessary
If you confirm that the refrigerant level is low and there are no detectable leaks, you can proceed to recharge your AC system. Always use the appropriate refrigerant type specified for your AC unit.
Following these steps will help you safely check the refrigerant levels in your AC unit, ensuring that it operates efficiently and effectively. Regular maintenance, including refrigerant checks, will extend the life of your air conditioning system.
Choosing the Right Type of Freon for Your System
When it comes to recharging your air conditioning (AC) system, selecting the appropriate type of Freon is crucial for optimal performance and efficiency. Freon, a brand name for refrigerants, acts as a medium for heat exchange within your AC system. It is essential to identify the correct refrigerant that your system is designed to use.
Understanding Refrigerants
Different AC units utilize various types of refrigerants based on their design and manufacturing year. The two most common types of Freon are R-22 and R-410A. R-22, also known as HCFC-22, has been widely used in older systems but has been phased out due to its environmental impact. R-410A, a more environmentally friendly alternative, is now the standard for new air conditioning systems.
Check Your System’s Requirements
To determine which type of Freon is suitable for your system, consult your owner’s manual or look for the manufacturer’s label typically affixed to the unit. This label not only specifies the correct refrigerant but also indicates the proper amount needed for charging. Using the wrong type of Freon can compromise system efficiency and lead to costly repairs.
Consider Environmental Regulations
It’s essential to comply with environmental regulations when selecting Freon. Many regions have restrictions on the use of R-22 and its sale has been severely limited. Transitioning to R-410A or other approved refrigerants is not just a practical choice; it is often a legal requirement. Always check local laws and adhere to guidelines for proper handling and disposal.
Professional Assessment
If you’re unsure about the correct type of Freon for your AC system, consider seeking professional assistance. Certified HVAC technicians can provide expert advice and may conduct a thorough assessment to ensure your unit operates at peak performance. They can also help identify potential leaks or issues that could impact the efficiency of your system.
In conclusion, choosing the right type of Freon is vital for ensuring the longevity and efficiency of your air conditioning system. Thoroughly understand your system’s specifications, comply with environmental standards, and seek professional guidance if needed to guarantee a successful recharge.
Tools Required for Recharging an AC System
Recharging an air conditioning system is a task that requires specific tools to ensure efficiency and accuracy. Proper equipment is essential for safely handling refrigerants, like freon, and maintaining the integrity of your AC system.
The first essential tool is a refrigerant manifold gauge set. This device allows you to measure the pressure of the refrigerant in the system. It typically features high-pressure and low-pressure gauges, giving you a clear indication of whether your system is undercharged or overcharged with freon.
Next, you’ll need a refrigerant can tap or adapter. This tool connects the refrigerant canister to the manifold gauge, enabling the transfer of freon into the AC system. It’s important to choose a compatible tap that matches the type of refrigerant used in your air conditioning unit.
A vacuum pump is also crucial for this process. Before recharging the system, evacuating the air and moisture helps prevent potential damage and ensures effective cooling. A vacuum pump creates a vacuum that removes contaminants from the system, preparing it for the new freon.
Additionally, safety gear is paramount. Protective gloves and goggles should always be worn when handling refrigerants. These substances can be hazardous, so it’s vital to take precautions to protect your skin and eyes from exposure.
Finally, a thermometer can help you monitor the outlet temperature of the air blowing from the AC vents. This tool allows you to verify that the system is performing optimally after the recharge, ensuring that you’re achieving the desired cooling effect.
By having the right tools, you can successfully and safely recharge your AC system with freon, restoring comfort to your space while ensuring proper function and longevity of the unit.
Step-by-Step Guide to Recharge Your AC System
Recharging your AC system is a crucial task to ensure optimal cooling performance. Follow this step-by-step guide to safely recharge your air conditioning system with freon.
Step 1: Gather Necessary Tools
Before you start, collect the required tools, including a refrigerant gauge manifold, a freon canister, safety goggles, and gloves. Make sure you have a basic understanding of your AC system’s specifications.
Step 2: Locate the Service Ports
Find the low-pressure and high-pressure service ports on your AC unit. The low-pressure port is typically larger and is where you will attach the refrigerant canister.
Step 3: Prepare the AC System
Start your vehicle or turn on your AC system to the maximum setting. Let it run for about 10 minutes to circulate the old refrigerant, which will help in the recharging process.
Step 4: Connect the Manifold Gauges
Attach the blue hose of the manifold gauge to the low-pressure service port. Ensure the connection is secure and check for any leaks before proceeding.
Step 5: Check the Current Pressure
With the gauges connected, read the pressure on the low-pressure gauge. This will help you determine if your system requires a recharge. A low reading indicates a need for more freon.
Step 6: Attach the Refrigerant Canister
Now, connect the yellow hose from the manifold gauge to the freon canister. Ensure the canister is upright for proper flow and avoid any spills.
Step 7: Recharge the System
Open the valve on the freon canister and the low-pressure side valve on the manifold gauge. Monitor the gauge as freon enters the system. It’s essential to add freon slowly to avoid overcharging.
Step 8: Monitor System Performance
While recharging, check the AC system’s performance and temperature output. If the system is cooling effectively, you may have added the correct amount of freon. Keep an eye on the gauges to ensure pressure remains within the recommended range.
Step 9: Disconnect the Equipment
Once recharging is complete, close the valves on the manifold gauge and the freon canister. Carefully disconnect the hoses from the service ports and replace the service port caps.
Step 10: Test the AC System
Turn off the engine and allow the system to sit for a few minutes. Then, start the vehicle again and test to ensure the AC is blowing cold air. If the system doesn’t perform as expected, consider consulting a professional technician.
By following these steps, you will safely recharge your AC system with freon and restore its cooling efficiency. Regular maintenance and checks will prolong the life of your air conditioning unit.
Common Mistakes to Avoid When Recharging AC
Recharging your air conditioning system with freon can greatly enhance its efficiency, but several common mistakes can lead to poor performance or even damage. Avoiding these pitfalls is crucial for a successful recharge.
1. Overcharging the System
One of the most prevalent mistakes is adding too much freon. Overcharging can create excessive pressure within the system, which may cause components to fail. Always consult the manufacturer’s specifications for the correct amount of freon required.
2. Not Using the Right Type of Freon
Ensure that you are using the type of freon specified for your AC unit. Using an incorrect refrigerant can damage your system and lead to inefficiencies. Check the unit’s label or handbook for the recommended type.
3. Failing to Check for Leaks
Before recharging, it’s essential to inspect your AC system for leaks. If there’s a leak, adding freon will do little to improve performance, as the refrigerant will escape. Use a leak detection kit or consult a professional to address any leaks.
4. Ignoring Symptoms of a Malfunctioning System
Many people assume that simply recharging the system will solve issues like inadequate cooling or strange noises. However, these symptoms often indicate underlying problems that need to be addressed before a recharge can be effective.
5. Skipping Safety Precautions
Working with refrigerants can be hazardous. Always wear protective gear, including gloves and goggles, when recharging your AC. Additionally, ensure you are working in a well-ventilated area to avoid inhaling harmful fumes.
6. Neglecting Maintenance
Regular maintenance of your AC system is critical. Neglecting to clean or replace filters, for instance, can lead to poor airflow and increased strain on the unit. Make sure to perform regular checks to keep the system in optimal condition.
By avoiding these common mistakes, you can ensure a successful recharge of your air conditioning system and maintain its efficiency over time. Proper care will prolong the life of your AC unit and enhance overall comfort in your home.